
Let’s explore some item management systems in survival crafting games, focusing on the controller as our main input method.
In this genre, quick and efficient inventory management is key.
When designing such systems, it’s important to balance the needs of hardcore survival fans who enjoy deep base-building and crafting with those who prefer exploration and adventure.
I defined a list of the players needs:
What do I want as a player?
- I want to pick up one item from a stack
- I want to pick up all items from a stack
- I want to split items from a stack
- I want to take a specific amount of items from a stack
- I don’t want to type on a physical/virtual keyboard
- I want to select multiple item stacks at once
- I want the process to deposit items into chests to be intuitive, smooth and fast
- I don’t want to have to drop all my inventory items into the chest
For the first step, I explored some established games of that genre. I was looking for games that:
- have a crafting system
- have one or multiple storage systems
- have a character inventory
- are available on console / have controller input
Games I looked at:
- Animal Crossing
- Minecraft
- Core Keeper
- The Legend of Zelda: Tears of the Kingdom
- V Rising
- Dragon Quest Builders
- Pacific Drive
- Baldur’s Gate 3
- Palworld
- Terraria
- Grounded
I took a deep dive into some of the more complex functions like splitting stacks, what functions the games offered in general and how each one of them handled the input mapping.
Splitting item stacks
My findings from selected games:
Core Keeper
 (A) to pick up a whole stack
 (LB) to split a stack into a smaller amount
 (RB) to transfer 1 more item to the held stack
- Both inputs are registered when you haven’t picked up anything yet. It automatically picks up part of the item stack.
- When you picked up the whole stack and press (RB) again, it places one item down into the inventory
- Items stay on your cursor until you place them
Potential issue: No mention in the HUD on how to control
Potential issue: Can’t decrease a stack size again (besides dropping 1 item), you can only increase
Baldur’s Gate 3
- Multiselect multiple item stacks by long-pressing
 (X)
(X) - On single item: (X) to open action drop down menu
- Split function available in the drop down menu
- Default split is 50/50
- You can change the amount with
 (left)/
 (right)
 - You can specify a split by entering a number (keyboard)
- Split amount ends up directly in your inventory, taking up a new slot
- Split function available in the drop down menu
Potential issue: Bigger stacks are slow to split
Potential issue: Requires keyboard input for precise amounts (tested on PC)
Terraria
- Grab a stack with (A)
- Take one item and add more with (LB)
- Speed at which you pick up items picks up over time, the longer you press
- Putting items in a chest is the same procedure
Palworld
- You can take half a stack by pressing (X)
The Legend of Zelda: Tears of the Kingdom
- Open action drop down with (A)
- There is a menu item to grab/hold the items
- you can hold up to 5 items
- (A) to increase the stack size, (X) to decrease
 (B) returns to the game with items in hand
- You can return items to the inventory with (B) or drop them with (A)
Selling items
- Declare which item
- A menu to set the amount appears
- You can control the amount with (left)/(right)
- increments of 1
- long-pressing increases the speed at which you select.
- You can control the amount with
- There is an option to sell all items of a type
- There is a final confirmation of price before selling
Potential issue: There is no multi-selling
Potential issue: You can’t set a specific amount to be sold, but you navigate to it quick enough.
Best Case Scenario
- You can pick up 1 item from a stack
- You can pick up all items in a stack
- You can split the stack
- You can split it in half
- You can define the size of the split
- You can define how much you want to pick up
- You can multiselect different item stacks
From here on, I build my prototype in Figma.
Layout
The layout of the interface is simple, as we want to focus on functionality. You have your backpack to the left and a chest on the right. The currently focused item slot has a highlighted outline and the bottom bar gives you contextual button prompts.

Navigation
You can navigate the inventory with either  (analog stick) or
  (d-pad).
Offering both (d-pad) and (analog stick) is important, as there are different preferences for each player.
While no item is grabbed, navigation is grid based. The focus jumps to the next available item.
While grabbing an item or item stack, you can freely move the stack across the screen with (analog stick).

Movement with (d-pad) is still grid based, for faster and more precise navigation. You can instantly jump from the backpack to the chest without the need to drag it all across the screen.

Grabbing stacks
By pressing (X) while focused on a stack, you can pick it up and move it around freely in your inventory. You can also drag it across to the chest with (analog stick) or drop it in the game world.
With (d-pad), you’re able to move along the grid for quicker navigation. It will also allow you to jump from backpack to chest pretty much instantly.
Final placement of your item stack is locked in by pressing (X) again. By pressing (B) while having something grabbed, the item stack snaps back to its original position.
Actions Menu
The different options for each item are tucked into a contextual drop down menu. This reduces visual clutter at the bottom of the screen, as you don’t need to explain all of the possible actions, and it allows for context sensitive additional actions. For example, in a co-op multiplayer session you could add the menu point [Send to Friend ‘XXX’]. Equipment items can have a [Compare] or [Equip] function, and Food could show [Use] or [Consume] etc.
It adds a certain aspect of exploration as well! Imagine finding a mysterious item that has [???] in their context menu!
Depositing items
You can open the previously mentioned actions menu with (A). The first default action of the list should also be the most used one, to allow a quick flow. While having a chest opened, the top selection would be [Deposit], allowing a quick succession of button presses to drop items into your chest. Once an item stack is deposited, the selection jumps to the next available item stack, making the process easy to repeat.

Auto deposit
But do you really want to spam (A) all the time? With the Auto Deposit function, you can take all the items from your backpack and add them to matching stacks in the chest. It will not deposit item types that aren’t already in the chest. You can trigger this function by long-pressing  (View).
This allows for dedicated storage systems to continue to function. You wouldn’t want to find a sandwich in your ore chest : )
Splitting a specific amount
With the [Split Specific Amount] action, you can take a defined amount of items from your stack. I decided against a virtual keyboard or the need of a physical one, as it always breaks the gameflow, taking you out to the OS keyboard or making you reach for the physical one. Instead you are faced with a number wheel UI.
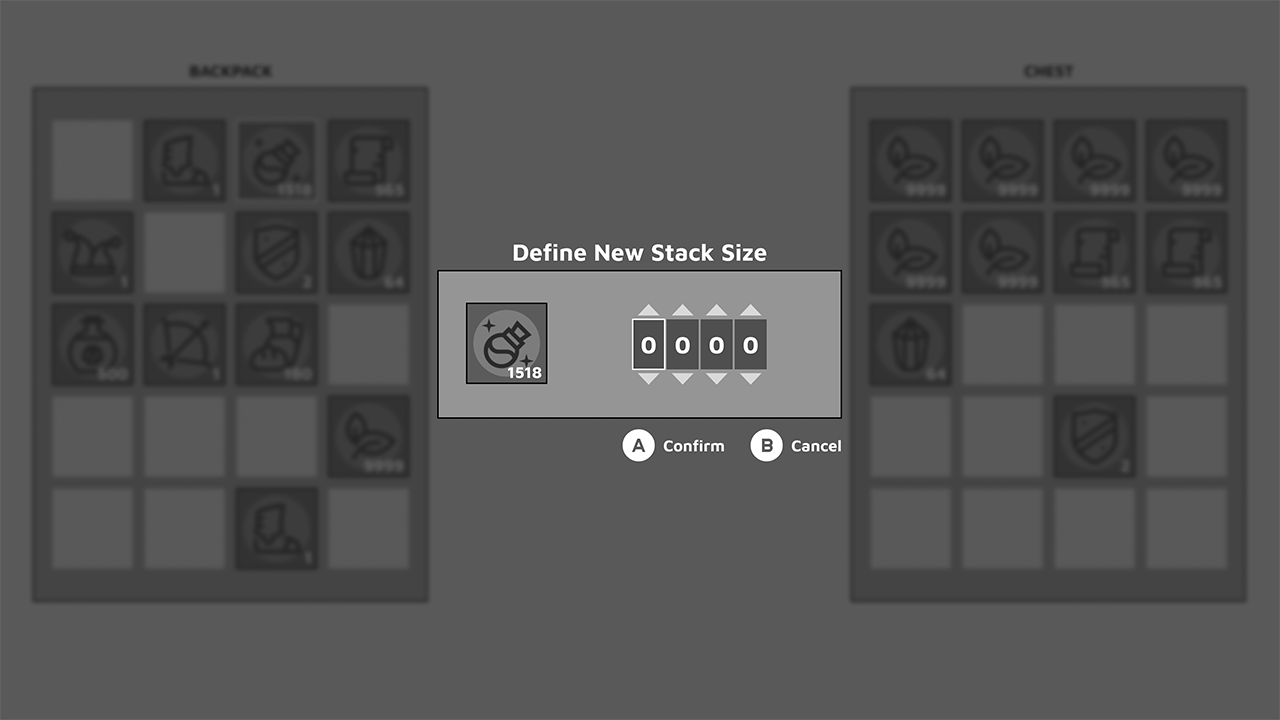
The current stack is shown to the left, making it easier to remember what items you’re dealing with and how much you have, allowing you to precisely set a desired amount while keeping track of your old stack. It’s important to keep this information on screen, just like when you’re filling out a form: you’ll want persistent labels there to remind you what you’re actually filling out.
Whereas on the right side of the small modal, you can set the desired amount by selecting a digit first and then increasing or decreasing the number by pressing up or down on your controller.
Ideally, the majority of crafting recipes would ask for round numbers anyway, so the amount of inputs required to reach the desired split amount is minimal.
After splitting, there’s 3 potential options for the new stack to appear:
- grabbed and attached to your cursor
- to the right of your old stack, pushing away other item stacks
- in the next free item slot, which could be before or after your old stack
I’m following my set pattern of split items being grabbed, as your most probable action will be depositing or dropping a certain amount. For example you want to share items with a friend, or withdraw a certain amount of items from your chest without taking the entire stack.
Now that your split stack is grabbed you can quickly drop the new item stack by pressing (X), which would place the item in the next freely available item slot of the origin system (backpack or chest).
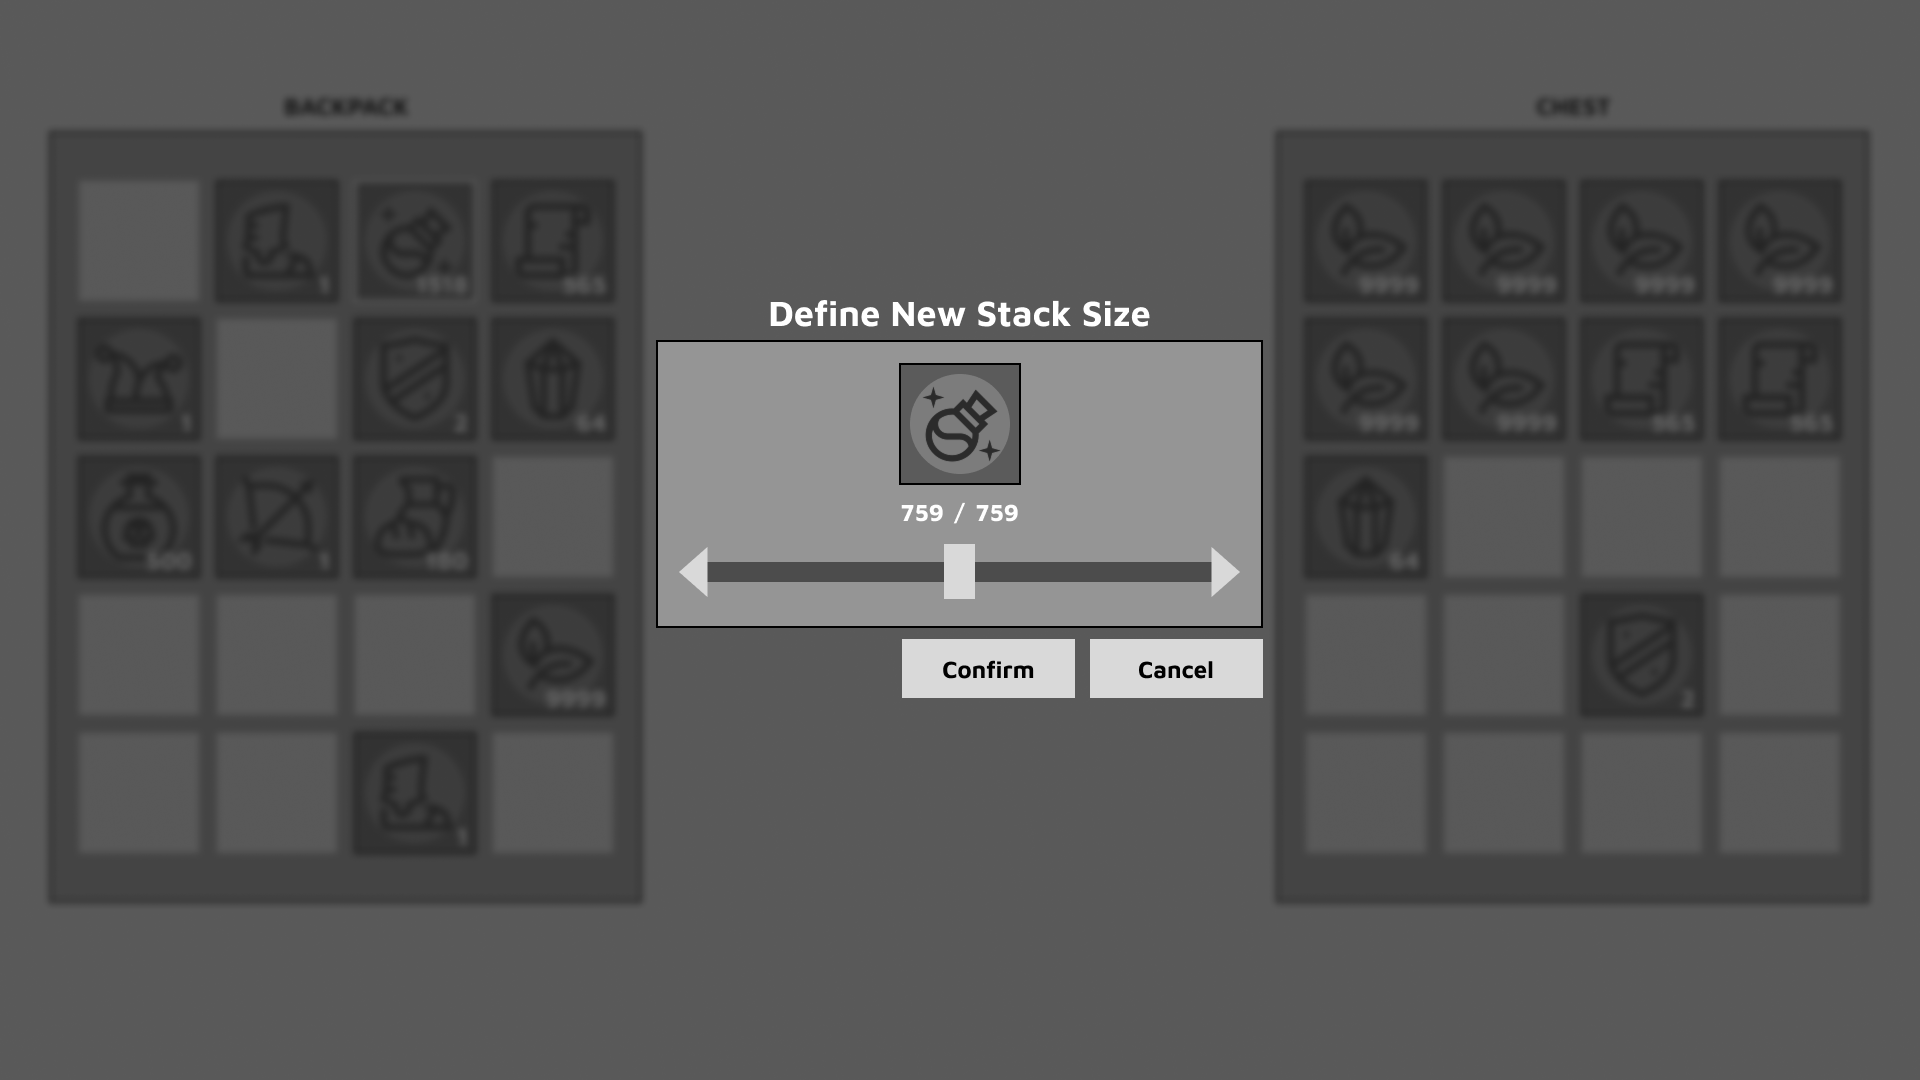
The mouse/keyboard version of this screen would look different. Instead of the number wheel you define the split with a slider.
Dropping items
Last but not least, we have the drop action in that menu.
The drop action takes the items out of your inventory and places them in the game world, without having to manually move the items over to the viewport to drop them there.

Extra splitting options
While you have a stack of items grabbed, the button prompts at the bottom inform you about additional quick splitting options.
The orientation on the controller here is
Left side ( and ) = Decrease
Right side ( and  )= Increase
With (LT) you can half a stack.

By pressing (RT), you add half of the stack that is now slotted, creating a two thirds and one third split, which might come in handy for some recipes. Of course you can keep splitting up the stacks until there’s no item left in either stack.

With (LB) you can decrease the grabbed stack size by increments of one. Vice versa, you increase the stack by one with (RB).

(LT) and (RB) can be initiated while just having a stack in focus – not grabbed – but it doesn’t show in the button prompts to avoid additional visual clutter and cognitive overload.

A quick example sequence:
| Button: | | | | | |
| Grabbed: | 0 | 250 | 375 | 374 | 437 |
| Inventory: | 500 | 250 | 125 | 126 | 63 |
Multiselect
Pressing  (Y) activates the multiselect mode with which you can grab, deposit or drop multiple stacks of different items.
You can deselect previously selected item stacks by focusing them and pressing (Y) again.

You can only grab and move multiselected items into free slots the way they had been arranged before. i.e. you cannot place your multiselection over existing item stacks, unless they are matching item types.
However, if you wish to deposit a certain range of items, regardless of their grid arrangement, you can multiselect them and just deposit them from the actions menu.
Input Mapping Overview
To sum it up, here’s a comprehensive list of the configured button mapping.
| Navigate the inventory | d-pad; left analog stick |
| Open actions menu; Confirm | A button |
| Cancel | B button |
| Grab item stack | X button |
| Activate multiselect | Y button |
| Auto deposit | View button (long press) |
| Decrease stack by one | LB button |
| Split stack in half | LT button |
| Increase stack by one | RB button |
| Pick up half of the stack | RT button |
Keyboard / Mouse Control
During my exploration I focused on controller support, but kept keyboard and mouse inputs in mind and how the different functions would translate. Here’s a quick overview:
| Grab entire stack | Left Click |
| Pick a single item from stack | Right Click |
| Split Half (Increase) | Shift + Right Click |
| Split Half (Decrease) | Shift + Left Click |
| Split Specific Amount | Middle Mouse Button, then scroll wheel / draggable slider |
| Deposit Stack | Alt + Left Click |
| Auto Deposit | Q |
| Multiselect | Ctrl+Left Click |
A lot of these functions should feel natural for Windows users, as things like Multiselect work exactly like that in file explorer. By keeping things close to how the OS handles it, you can decrease the amount of unnecessary friction.
Auto-Sorted vs. Free Grid Inventory
Some players have very specific ways of arranging their inventory. Weapons and Usables to the top row, Bombs and Arrows to the bottom etc.
This is the reason I decided against automatically sorting the inventory for you and closing any gaps, creating a subsequent grid of items.
If desired, there’s always the option to add a “Tidy Up” button somewhere in the UI, which shouldn’t be easy to misclick, to avoid any frustration with accidentally cleaning up your personal sorting.
Things beyond the inventory
UX and game design are very interwoven, and while this system works on its own, it’s always important to consider the game feel and desired systems. A few considerations would be:
- How strong should the immersion / survival factor be?
- Higher immersion = less “QoL”
- Is the player vulnerable while in the menu? (to enemy attacks, cold, hunger, etc.)
- If yes: A quick and memorisable flow is important
- If yes: the interface shouldn’t be too obstructing
- Can items / stacks have durability or expiry time?
- Can you craft from nearby chests without picking up the items first?
- Should you be able to quick stack to nearby chests without interacting with them first?
- Nice to have: A tooltip showing you how many items you have of the selected type in backpack, storage, etc.
- Nice to have: Show / hide item details
- Nice to have: A way to search for a specific item
Button Images by Kenney Games
Item Icons by icons8
